User Guide
Introduction
Teacher’s Pet is a desktop app for managing students, tailored for Teaching Assistants (TA) in the National University of Singapore (NUS). With Teacher’s Pet, you can easily add, edit, delete, and view student information, as well as track their attendance, all using only your keyboard. Teacher’s Pet offers a lightweight, efficient solution optimized for small (<30 students) classes and works completely offline, promising performance even with an unstable network connection.
This user guide was designed to aid you in understanding how to use our product for your classroom needs. We recommend you to read this guide in sequence. That being said, do not worry if this guide seems overwhelming. You can use our Table of Contents to navigate to different sections.
Our guide is structured as such:
- Quick Start: A quick guide on how to download and start Teacher’s Pet
- Commands: An in-depth explanation on how to use our features
- Command Summary: A quick summary of all our commands
- FAQ: Answers to some common questions users have
- Known Issues: A list of known issues
If you are new to Teacher’s Pet, we recommend you to continue reading this guide sequentially (starting with Quick Start) to get a complete idea of how it works.
If you are already using Teacher’s Pet, skipping to the Commands or Command Summary section may be more useful.
How to navigate this user guide
Here are some symbols you may encounter in this user guide:
This contains some additional information
Table of Contents
- Introduction
- Quick Start
-
Commands
-
General Commands
- Viewing help :
help - Adding a student:
add - Editing a student :
edit - Commenting on a student:
comment - Listing all students :
list - Displaying students in a group :
show - Finding students by name or student ID:
find - Selecting a student randomly:
random - Deleting a student :
delete - Clearing all entries :
clear - Exiting the program :
exit
- Viewing help :
- Managing Attendance
-
General Commands
- Data Management
- Command summary
- FAQ
- Known issues
Quick Start
You can refer to the FAQ section below for more information.
-
Ensure you have Java
17or above installed in your Computer. You may download Java 17 through this link. -
Download the latest
teacherspet.jarfile from here. The downloaded file should be found in yourDownloadsfolder. -
Copy the file, make an empty folder in your
Documentsfolder and pasteteacherspet.jarin the new folder. -
Open a command terminal, enter
cd Documents/NAME_OF_YOUR_FOLDER. Then, enterjava -jar teacherspet.jarto run the application.
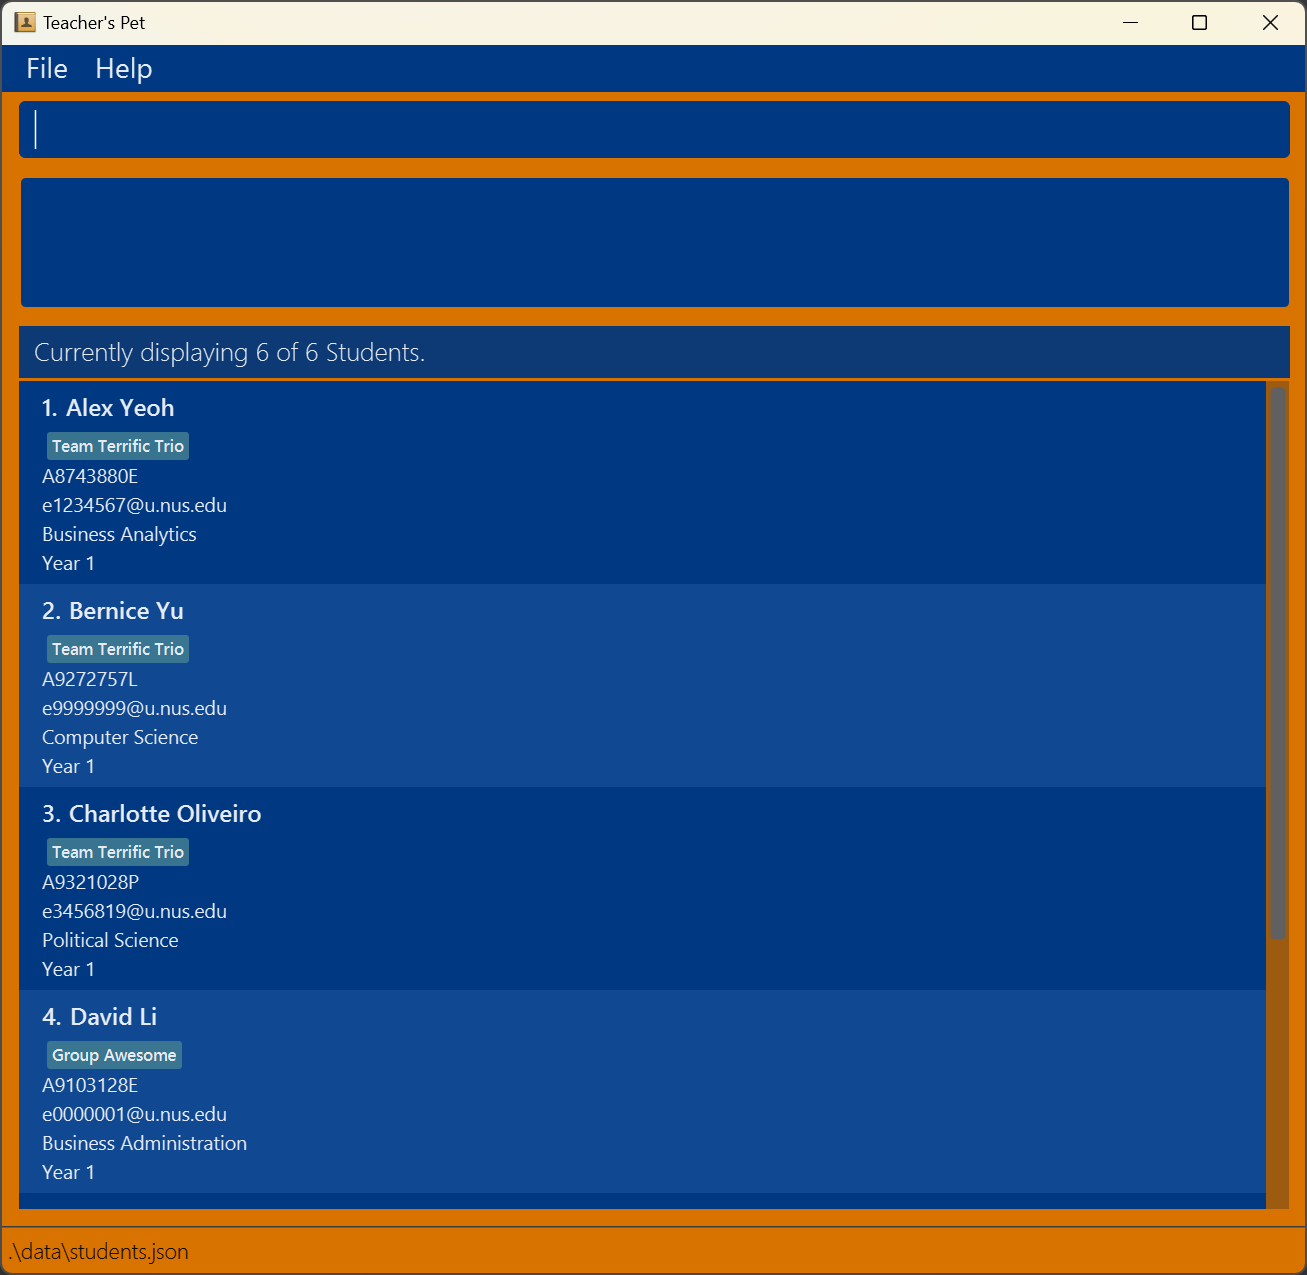
A window similar to the one below should appear in a few seconds. Note how the app contains some sample data.
-
Type the command in the command box and press Enter to execute it. e.g. typing
helpand pressing Enter will open the help window.
Some example commands you can try:-
list: Lists all students. -
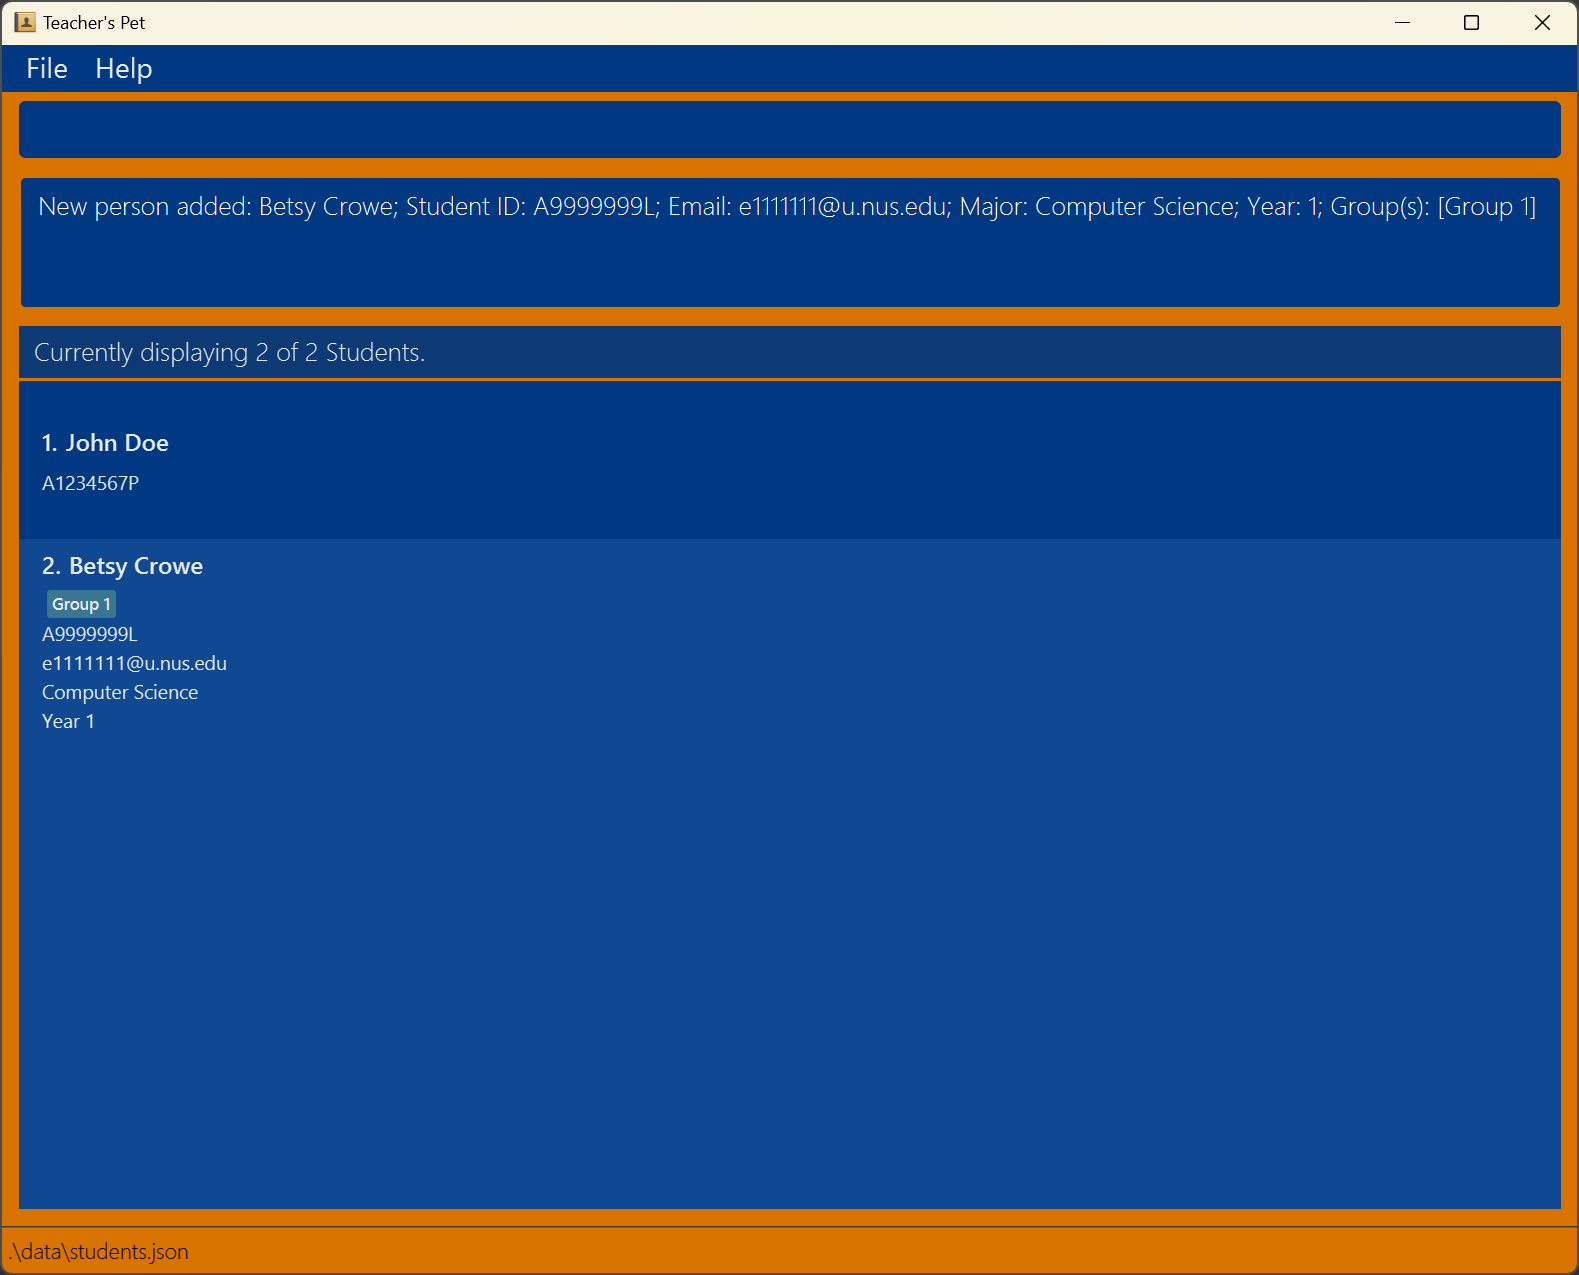
add n/John Doe id/A1234567B nid/E1234567 m/Math y/2 g/group 1: Adds a student namedJohn Doeto the app. -
delete 3: Deletes the 3rd student shown in the current list. -
clear: Deletes all students. -
exit: Exits the app.
-
-
Refer to Commands below for more details of each command. Alternatively, refer to Command Summary for a cheatsheet of commands and how to use them.
teacherspet.jar file).
Frequently Asked Questions (Quick Start)
Back to Quick Start
Q: How do I check what version of Java I have on my device?
A: You can refer to this link for more information.
Q: I clicked the link to install Java 17, now which file should I download?
A: You want to look for the file with Installer in its name for the Operating System of your device (eg. macOS x64 DMG Installer if you use an Apple device). After downloading the file, simply run it to install Java 17.
Q: How do I open a command terminal?
A: If you are using a Windows device, search for Windows PowerShell or Command Prompt. If you are using a Mac/Apple device, search for Terminal.
Q: After running the app, some messages appear on my terminal, should I be concerned?
A: If a window similar to the one in the image above appears, then the app is working well and you can safely ignore any messages on the terminal.
Commands
![]() Information:
Information:
Notes about the command format:
-
Words in
UPPER_CASEare the parameters to be supplied by you.
e.g. inadd n/NAME,NAMEis a parameter which can be used asadd n/John Doe. -
Items in square brackets are optional.
e.gn/NAME [m/MAJOR]can be used asn/John Doe m/Businessor asn/John Doe. - Parameters can be in any order.
e.g. if the command specifiesn/NAME id/NUS_STUDENTID,id/NUS_STUDENTID n/NAMEis also acceptable. -
The prefixes must be preceded by a space character. e.g.
add n/John Doeis correct, butaddn/John Doeis not. - If you are using a PDF version of this document, be careful when copying and pasting commands that span multiple lines as space characters surrounding line-breaks may be omitted when copied over to the application.
General Commands
Viewing help : help
Shows you a message containing a link to a more in depth user guide to help you!

Format: help
Adding a student: add
You can add a student easily to Teacher’s Pet!
Format: add n/NAME id/NUS_STUDENTID [nid/NUS_NETID] [m/MAJOR] [y/YEAR] [g/GROUP_NAME]
- The
NUS_STUDENTIDhere refers to the NUS Matriculation Number of the student (Has the format ‘AXXXXXXXC’, where X is any number and C is any letter) - The
NUS_NETIDhere refers to the ID that is associated with the student’s NUS Outlook account (Found in “NUS_NETID@u.nus.edu” and must be in the format ‘eXXXXXXX’, where X is any number) - The
NUS_STUDENTIDmust be unique (ie. Two students cannot have the sameNUS_STUDENTID)
Here are some examples for you to try!
add n/John Doe id/A1234567Padd n/Betsy Crowe m/Computer Science nid/e1111111 id/A9999999L y/1 g/Group 1
Editing a student : edit
Need to change a student’s details? You can edit an existing student in Teacher’s Pet.
Format: edit INDEX [n/NAME] [id/STUDENTID] [nid/EMAIL] [m/MAJOR] [y/YEAR] [g/GROUP_NAME]
- Edits the student at the specified
INDEX. The index refers to the index number shown in the displayed student list. The index must be a positive unsigned integer 1, 2, 3, … - At least one of the optional fields must be provided.
- Existing values will be updated to the input values.
g/), the information of that field would be reset. This works for all fields except Name and Student ID.
![]() Information:
Information:
When using the edit command, note that:
- You are unable to edit comments via the
editcommand. - There should be no additional arguments between the
INDEXand the first prefix (e.gedit 1 blah n/ Johnis wrong and should instead beedit 1 n/ John)
Continuing from the previous example in add, you could try this:
-
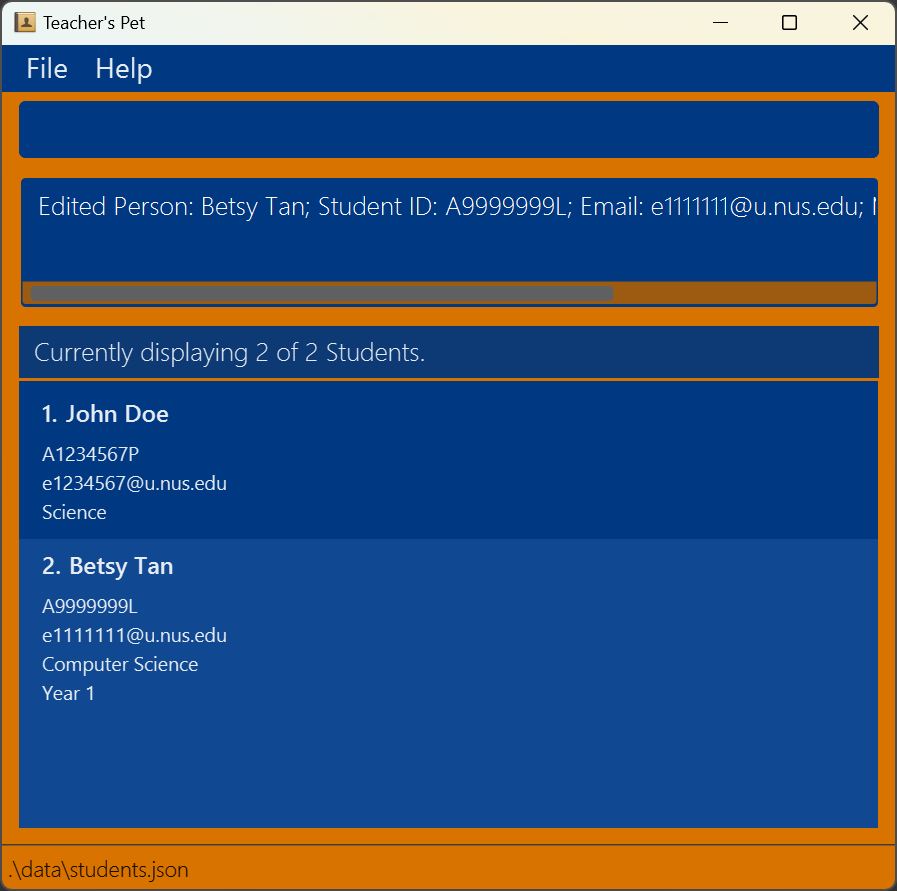
edit 1 m/ Science nid/e1234567Edits the major and NUS NetID of the 1st student to beScienceande1234567respectively. -
edit 2 n/Betsy Tan g/Edits the name of the 2nd student to beBetsy Tanand clears all of Betsy’s groups.
Commenting on a student: comment
Comments on one of your students in Teacher’s Pet.
Format: comment INDEX c/COMMENT
comment INDEX c/ but without
any COMMENT.
- The
INDEXrefers to the index number shown in the displayed student list.INDEXmust be a positive integer 1, 2, 3, … - The
COMMENTrefers to any input you want to use as a comment.
Examples:
comment 1 c/Is always late to class.comment 1 c/
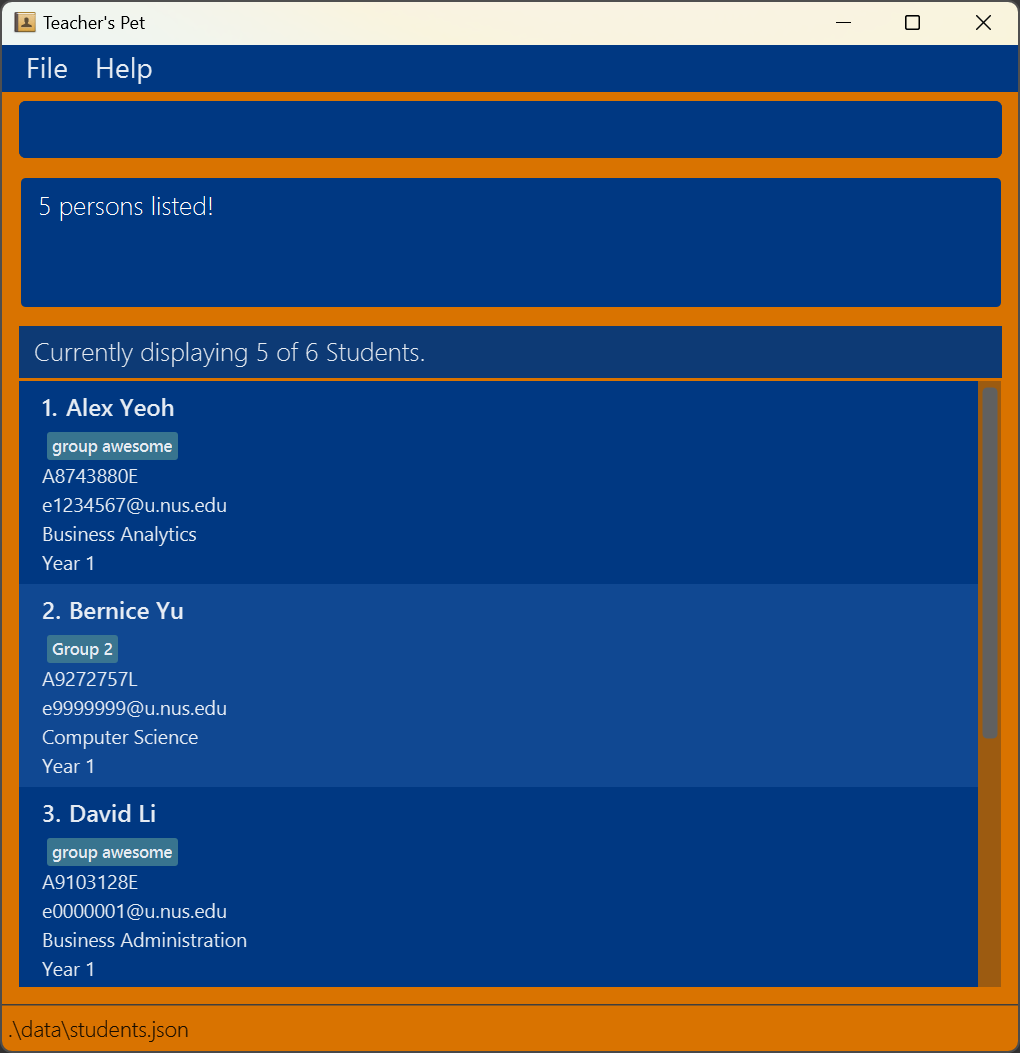
Listing all students : list
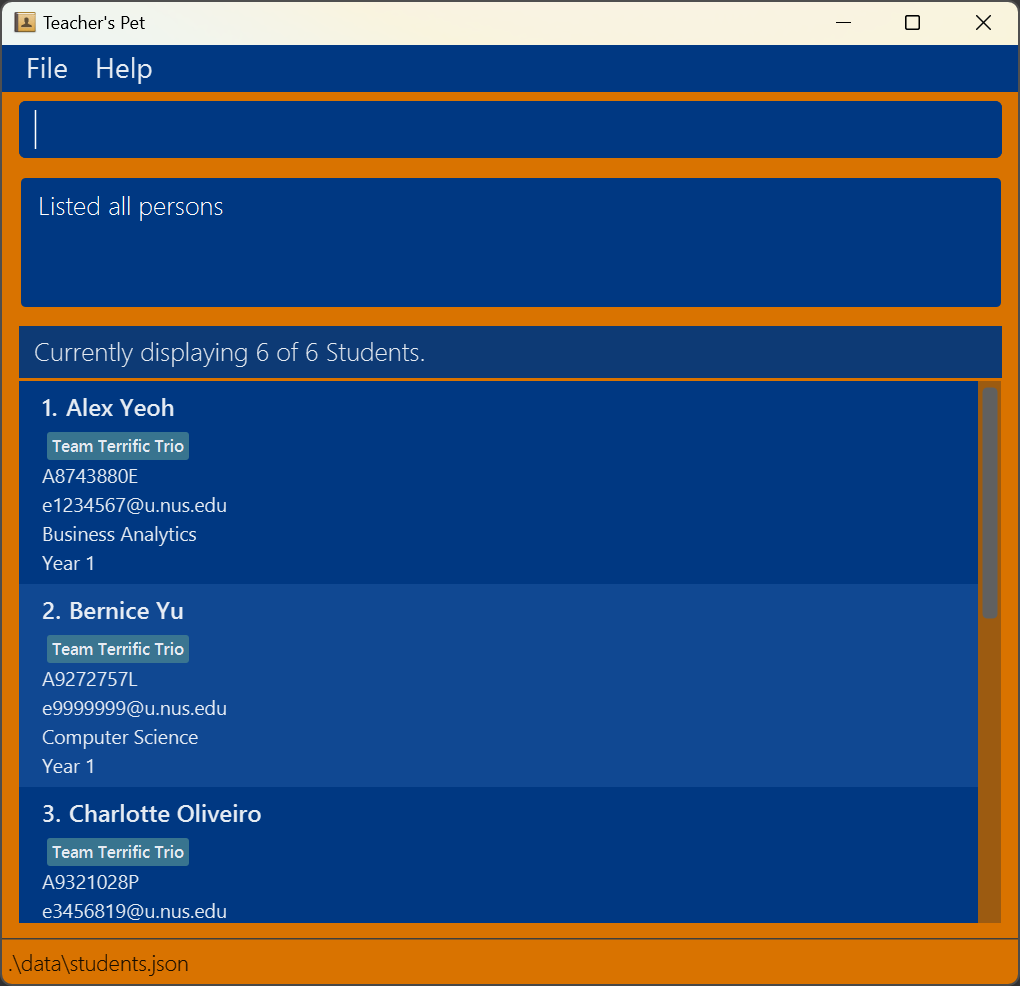
You can view a list of all students stored in Teacher’s Pet.
Format: list
- Note that there should be no additional arguments after
list(eg.list all)
Here is an example of what you might see, our lists would be different, of course!:
Displaying students in a group : show
You can view a list of students in the same group(s)
Format: show KEYWORDS
- The KEYWORDS is/are the group name(s) or identifier(s) you would like to search for in your current list. For instance, use
group 1or1orgroupto search forgroup 1 - The search is case-insensitive. e.g.,
group 1will matchGROUP 1. - The order of the keywords does not matter. e.g.,
1 groupwill matchgroup 1.
gro will find group 1, but not 1 group, as 1 group does not begin with gro.
Here is an example you could try:
-
show group 2returns students who are in groups containing the wordsgroupor2(or both).
Finding students by name or student ID: find
Finds students matching the specified criteria.
Format: find [n/ NAME_KEYWORDS] [id/ STUDENT_IDS]
- The search is case-insensitive. e.g.,
hanswill matchHans. - The order of the keywords does not matter. e.g.,
Hans Bowill matchBo Hans. - Only full words will be matched for names. e.g.,
Hanwill not matchHans. - Student IDs must match exactly.
- At least one of the optional prefixes must be provided.
- Students matching any of the criteria will be returned (i.e.,
ORsearch). e.g.,find n/ Hans Bo id/ A1234567Ewill return students whose names containHansorBo, or whose student ID isA1234567E.
Examples:
-
find n/ Johnreturns students with names containingJohn. -
find id/ A1234567E A2345678Breturns students with student IDsA1234567EorA2345678B. -
find n/ alex davidreturnsAlex Yeoh,David Li
-
find n/ Alice id/ A1234567Ereturns students whose name containsAliceor whose student ID isA1234567E.
Selecting a student randomly: random
You can randomly select a student from the current list! For example, you may want to randomly select a student to answer your question.
show command first before using random if you want to select a random student from a particular group.
Format: random

Deleting a student : delete
Deletes one of your specified students from your list.
Format: delete INDEX
- The delete command deletes the student at the specified
INDEX. - The
INDEXrefers to the index number shown in the displayed student list. - The
INDEXmust be a positive integer 1, 2, 3, …
Examples:
-
listfollowed bydelete 2deletes the 2nd student in the list. -
find n/ Nicfollowed bydelete 1deletes the 1st student named Nic.
Expected Results:
- If successful, you will be notified on which student you have deleted.
Clearing all entries : clear
Lets you clears all your students entries from Teacher’s Pet.
Format: clear
Exiting the program : exit
Lets you close the Teacher’s Pet application.
Format: exit
Managing Attendance
Teacher’s Pet allows you to create and manage attendance events, such as lectures, tutorials, or lab sessions. You can mark or unmark students’ attendance for these events.
![]() Information:
Information:
General Contraints
-
Event Names:
- Event names cannot be empty.
- Event names cannot contain the
/character. - Event names are case-insensitive when matching existing events and checking for duplicates.
-
Student Indices:
- Each index must be a positive integer corresponding to a student in the current displayed list.
- Each index must be prefixed with
i/. - Duplicate indices are not allowed within the same command.
Creating Attendance Events: createattn
Creates one or more new attendance events.
Format: createattn e/EVENT_NAME [e/EVENT_NAME]...
-
Event Names (Refer to Constraints):
- Specify one or more event names using the
e/prefix. - Duplicate event names within the same command are not allowed.
- If an event with the same name already exists, the command will fail and indicate the first event which already exists.
- Specify one or more event names using the
All students are marked as absent by default during the creation of an event.
Examples:
-
createattn e/Tutorial 1- Creates an attendance event named “Tutorial 1”.
-
createattn e/Lecture 1 e/Lab Session- Creates two attendance events: “Lecture 1” and “Lab Session”.
- Creates two attendance events: “Lecture 1” and “Lab Session”.
Deleting Attendance Events: deleteevent
Deletes one or more attendance events.
Format: deleteevent e/EVENT_NAME [e/EVENT_NAME]...
-
Event Names (Refer to Constraints):
- Specify one or more event names using the
e/prefix. - Duplicate event names within the same command are not allowed.
- If any specified event does not exist, the command will fail and indicate the first event which was not found.
- Specify one or more event names using the
Examples:
-
deleteevent e/Tutorial 1- Deletes the attendance event named “Tutorial 1”.
-
deleteevent e/Lecture 1 e/Lab Session- Deletes “Lecture 1” and “Lab Session”.

- Deletes “Lecture 1” and “Lab Session”.
Listing All Attendance Events: listevents
Displays a list of all attendance events.
Format: listevents
-
No Additional Parameters:
- The command must be exactly
listevents. - Any additional input will result in an error.
- The command must be exactly
Examples:
-
listevents- Displays all attendance events.
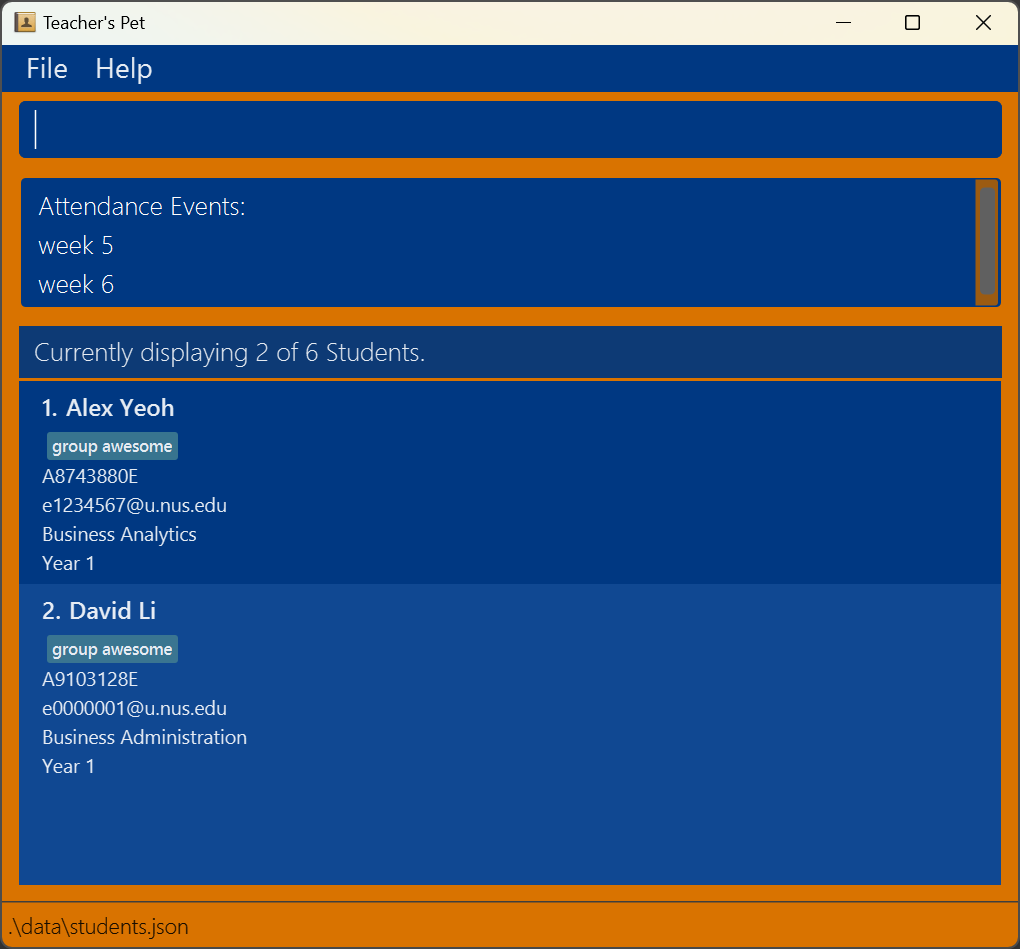
- Displays all attendance events.
Marking Student Attendance: mark
Marks one or more students as present for a specific attendance event.
Format: mark e/EVENT_NAME i/INDEX [i/INDEX]...
-
Event Name (Refer to Constraints):
- Specify exactly one event name using the
e/prefix. - The event must exist in Teacher’s Pet.
- Specify exactly one event name using the
-
Student Indices:
- Specify one or more student indices using the
i/prefix. - Attendance is not marked for any student, if any one of the indices is invalid (or duplicate).
- Specify one or more student indices using the
-
Existing Attendance:
- If a student is already marked as present for the event, they will be skipped. No warning or error message will be given, to allow for marking multiple students at once.
If a student is not marked as present, they are automatically marked as absent for the event.
Examples:
-
mark e/Tutorial 1 i/1- Marks the student at index 1 as present for “Tutorial 1”.
-
mark e/lecture 2 i/1 i/3 i/5- Marks students at indices 1, 3, and 5 as present for “lecture 2”.
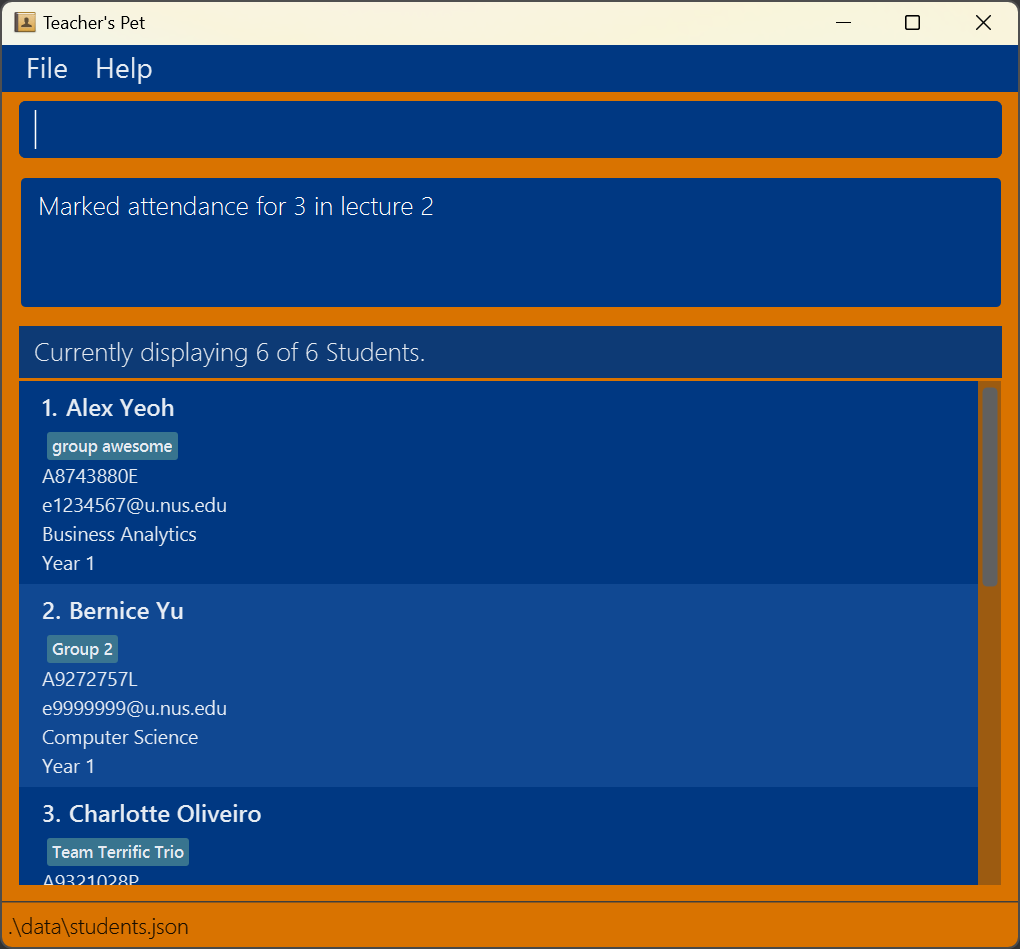
- Marks students at indices 1, 3, and 5 as present for “lecture 2”.
Unmarking Student Attendance: unmark
Marks one or more students as absent for a specific attendance event.
Format: unmark e/EVENT_NAME i/INDEX [i/INDEX]...
-
Event Name (Refer to Constraints):
- Specify exactly one event name using the
e/prefix. - The event must exist in Teacher’s Pet.
- Specify exactly one event name using the
-
Student Indices:
- Specify one or more student indices using the
i/prefix. - Attendance is not marked for any student, if any one of the indices is invalid (or duplicate).
- Specify one or more student indices using the
-
Existing Attendance:
- If a student is already marked as absent for the event, they will be skipped. No warning or error message will be given, to allow for unmarking multiple students at once.
Examples:
-
unmark e/Tutorial 1 i/2- Marks the student at index 2 as absent for “Tutorial 1”.
-
unmark e/lecture 2 i/2 i/4 i/6- Marks students at indices 2, 4, and 6 as absent for “lecture 2”.

- Marks students at indices 2, 4, and 6 as absent for “lecture 2”.
Listing Attendance for an Event: listattn
Displays the list of students who are either present or absent for a specific attendance event.
Format: listattn e/EVENT_NAME s/STATUS
-
Event Name (Refer to Constraints):
- Specify exactly one event name using the
e/prefix. - The event must exist in Teacher’s Pet.
- Specify exactly one event name using the
-
Status:
- Specify exactly one status using the
s/prefix. - Accepted values:
presentorabsent(case-insensitive).
- Specify exactly one status using the
Examples:
-
listattn e/Tutorial 1 s/present- Lists all students marked as present for “Tutorial 1”.
-
listattn e/Lecture 2 s/absent- Lists all students marked as absent for “Lecture 2”.
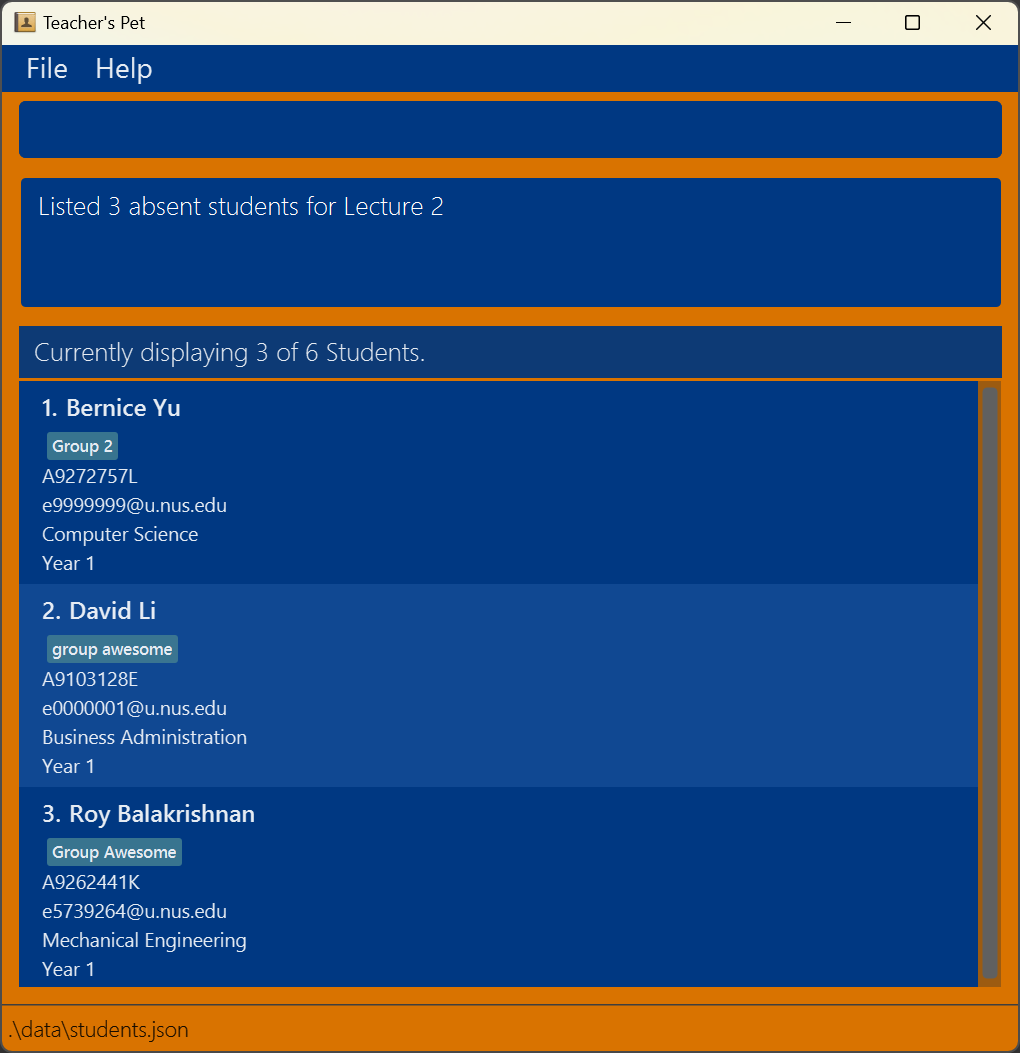
- Lists all students marked as absent for “Lecture 2”.
![]() Information:
Information:
Common Errors and Solutions
-
Invalid Command Format:
- If you include extra text or parameters not specified in the command format, you will receive an error.
- Solution: Ensure your command matches the specified format exactly.
-
Event Not Found:
- If you attempt to mark, unmark, or list attendance for an event that does not exist.
-
Solution: Use
listeventsto view existing events and ensure the event name is correct.
-
Duplicate Entries:
- If you specify duplicate event names or indices within the same command.
- Solution: Remove duplicates so each event name or index appears only once.
-
Invalid Indices:
- If you specify indices that are not positive integers or do not correspond to any student in the displayed list.
- Solution: Check the current student list and use valid indices.
-
Combining Commands:
- Use the
findorshowcommands to filter the student list before marking or unmarking attendance.
- Use the
-
Consistent Event Naming:
- Decide on a consistent naming convention for events to avoid confusion. (eg.
Tutorial 1,Tutorial 2…)
- Decide on a consistent naming convention for events to avoid confusion. (eg.
-
Regularly List Events:
- Use
listeventsfrequently to keep track of all your attendance events.
- Use
Data Management
Saving the data
Teacher’s Pet data is saved in the hard disk automatically after any command that changes the data. There is no need to save manually.
Editing the data file (Advanced)
Teacher’s Pet data is saved automatically as a JSON file [JAR file location]/data/students.json. Advanced users are welcome to update data directly by editing that data file.
Furthermore, certain edits can cause Teacher’s Pet to behave in unexpected ways (e.g., if a value entered is outside of the acceptable range). Therefore, edit the data file only if you are confident that you can update it correctly.
Command summary
| Action | Format, Examples |
|---|---|
| Help | help |
| Add |
add n/NAME id/NUS_STUDENTID [nid/NUS_NETID] [m/MAJOR] [y/YEAR] [g/GROUP_NAME] e.g., add n/James Ho id/A1234567X nid/e1234567 m/Computer Science y/2 g/Group 4
|
| Edit |
edit INDEX [n/NAME] [id/STUDENTID] [nid/EMAIL] [m/MAJOR] [y/YEAR] [g/GROUP_NAME]e.g., edit 1 n/James Lee y/4
|
| Comment |
comment INDEX c/COMMENTe.g., comment 1 c/Is always late to class
|
| List | list |
| Show | show KEYWORDS |
| Find |
find [n/ NAME_KEYWORDS] [id/ STUDENT_IDS]e.g., find n/ James Jake, find id/ A1234567E A2345678B, find n/ Alice id/ A1234567E
|
| Random | random |
| Delete |
delete INDEXe.g., delete 3
|
| Clear | clear |
| Exit | exit |
| Create Attendance Event |
createattn e/EVENT_NAME [e/EVENT_NAME]...e.g., createattn e/Tutorial 1 e/Lab Session
|
| Delete Attendance Event |
deleteevent e/EVENT_NAME [e/EVENT_NAME]...e.g., deleteevent e/Tutorial 1 e/Lab Session
|
| List Attendance Events | listevents |
| Mark Attendance |
mark e/EVENT_NAME i/INDEX [i/INDEX]...e.g., mark e/Tutorial 1 i/1 i/2
|
| Unmark Attendance |
unmark e/EVENT_NAME i/INDEX [i/INDEX]...e.g., unmark e/Tutorial 1 i/1 i/2
|
| List Attendance |
listattn e/EVENT_NAME s/STATUSe.g., listattn e/Tutorial 1 s/present
|
FAQ
Q: Where is my data saved?
A: The data file for Teacher’s Pet is named students.json and is saved in [JAR file location]/data/students.json by default. (ie, if your teacherspet.jar file is in Documents then the data file is found in Documents/data/students.json)
Q: How do I transfer my data to another device?
A: Install and run the app on the other device (See Quick Start above). Then, find the data file on the other device (See above) and replace the students.json file with the students.json file from the previous device.
Q: How do I keep a copy of my data?
A: Find the students.json file and copy it to your desired location/storage device
Q: What is the maximum size of my student list?
A: The maximum size is 2,147,483,647 students.
Q: Does the application require internet connection to run?
A: After installation, the application does not require internet connection. Files are saved locally.
Known issues
-
When using multiple screens, if you move the application to a secondary screen, and later switch to using only the primary screen, the GUI will open off-screen. The remedy is to delete the
preferences.jsonfile created by the application before running the application again. -
If you minimize the Help Window and then run the
helpcommand (or use theHelpmenu, or the keyboard shortcutF1) again, the original Help Window will remain minimized, and no new Help Window will appear. The remedy is to manually restore the minimized Help Window.